Step by Step Process of Parrot OS Installation
What is Parrot OS
Parrot is a free and open-source Linux system based on Debian that is popular among security researchers, security experts, developers, and privacy-conscious users. It comes with cyber security and digital forensics arsenal that is totally portable. It also includes everything you'll need to make your own apps and protect your online privacy. Parrot is offered in Home and Security Editions, as well as a virtual machine and a Docker image, featuring the KDE and Mate desktop environments.
Features of Parrot OS
The following are some of the features of Parrot OS that set it apart from other Debian distributions:
- Tor, Tor chat, I2P, Anonsurf, and Zulu Crypt, which are popular among developers, security researchers, and privacy-conscious individuals, are included as pre-installed development, forensics, and anonymity applications.
- It has a separate "Forensics Mode" that does not mount any of the system's hard discs or partitions and has no impact on the host system, making it more stealthy than the usual mode.
- Parrot Security OS features a range of advanced language compilers, interpreters, and IDEs in addition to tools for ethical hacking and penetration testing.
- The Parrot OS also has hardware programming and forensics capabilities. Other radio sniffing tools include the Arduino IDE, GNU Radio, Kayak, and others.
- Parrot OS is more user-friendly than Black Arch Linux and Kali Linux.
Minimum Requirements
CPU: Dual-core x86_64 Processor or better
RAM: 2 GB DDR2
Storage: 20 GB available space
IOS VS OVA
An ISO image is a file that precisely replicates the contents of a CD, DVD, or Blu-ray disc. A single ISO file may accurately copy a disk's entire contents. One of the benefits of using an OVA file is that it eliminates the need to construct a separate bootable flash drive or partition, and all configurations are already completed.
Open Virtual Application files, also known as Open Virtualization Format Archive files, are a type of OVA file. They are used by virtualization systems to store various files connected to a virtual machine. Among the files you might discover there are disc images (such as VMDKs), an OVF descriptor XML file, ISOs or other resource files, certificate files, and an MF manifest file. One of the benefits of using an OVA file instead of an ISO file is that we don't have to create a separate bootable flash drive or drive partition, and all of the configurations are already done for us.
Parrot OS Download
Step 1:Go to the official parrot download page, you will be presented with two options OVA Home and OVA Security.
Step 2: Choose the Edition as per your requirement and click on download, the Home Edition has the basic toolset ready for daily requirements and the Security Edition consists of a larger toolset for pen-testing and forensics.
Step 3: The downloaded file named a parrot-home-4.11.3_virtual.ova
How to Install Parrot OS
First, you have to download Virtual Box
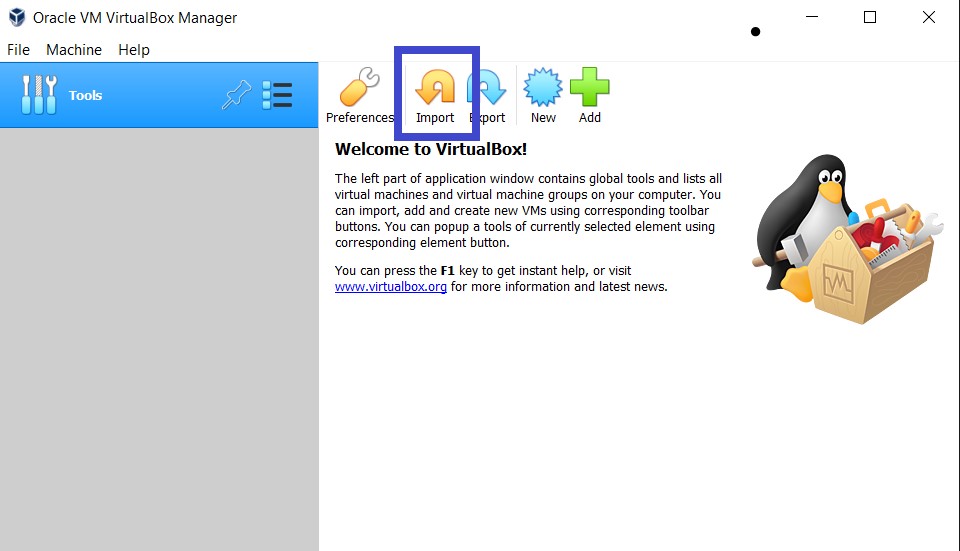
Step 1: Start the Virtual box application and click on Import.
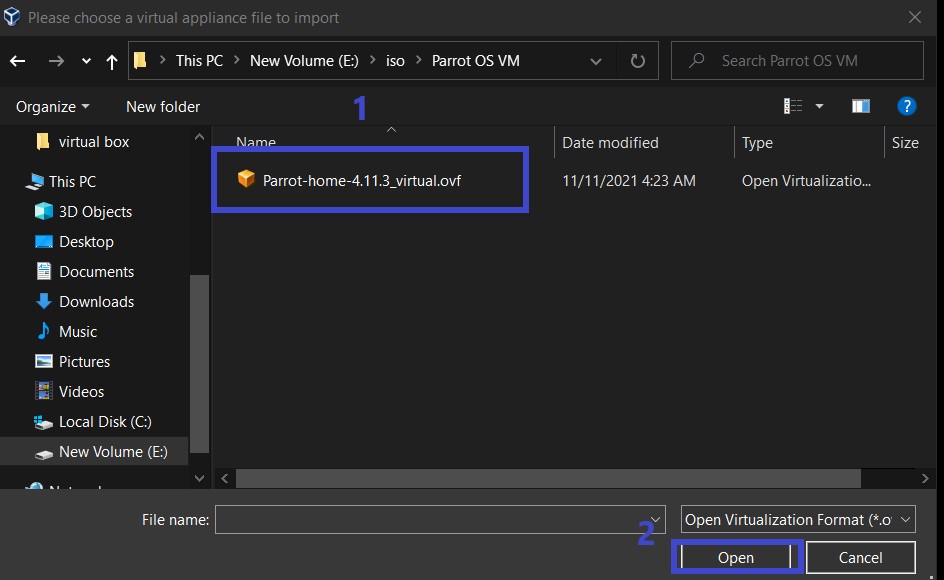
Step 2: A new window should appear, click on the file icon.
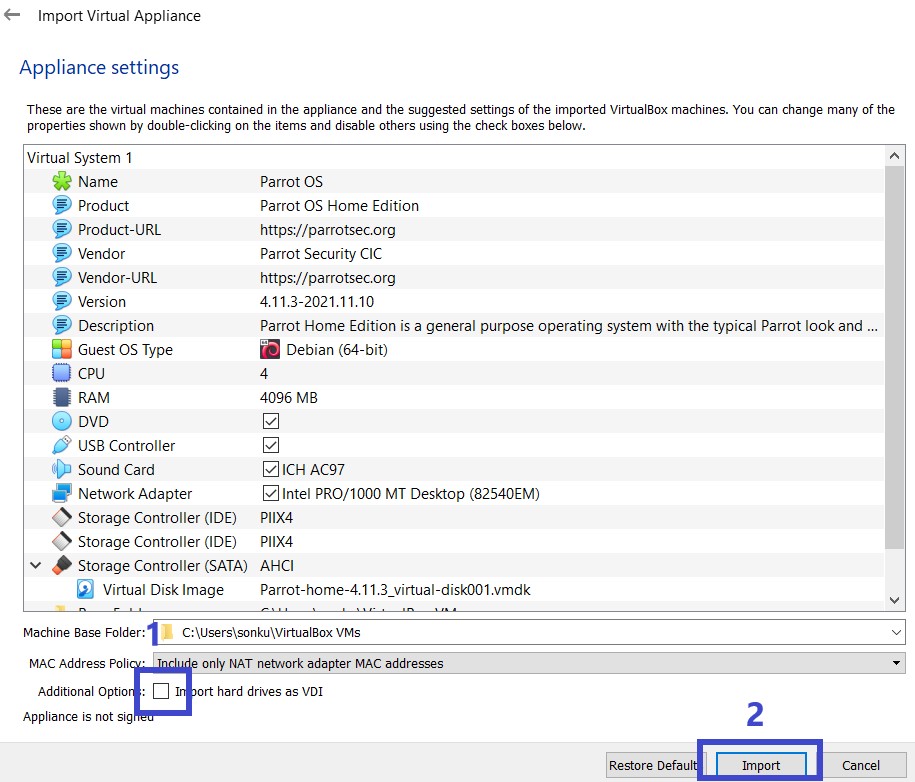
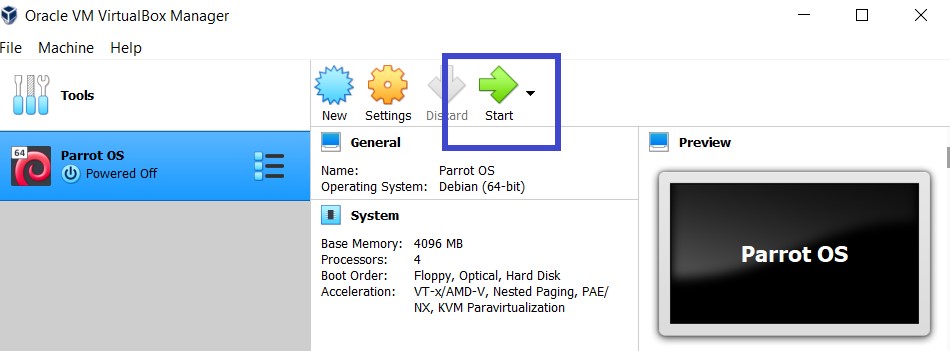
Step 5: Agree to the terms and wait for the import to finish.
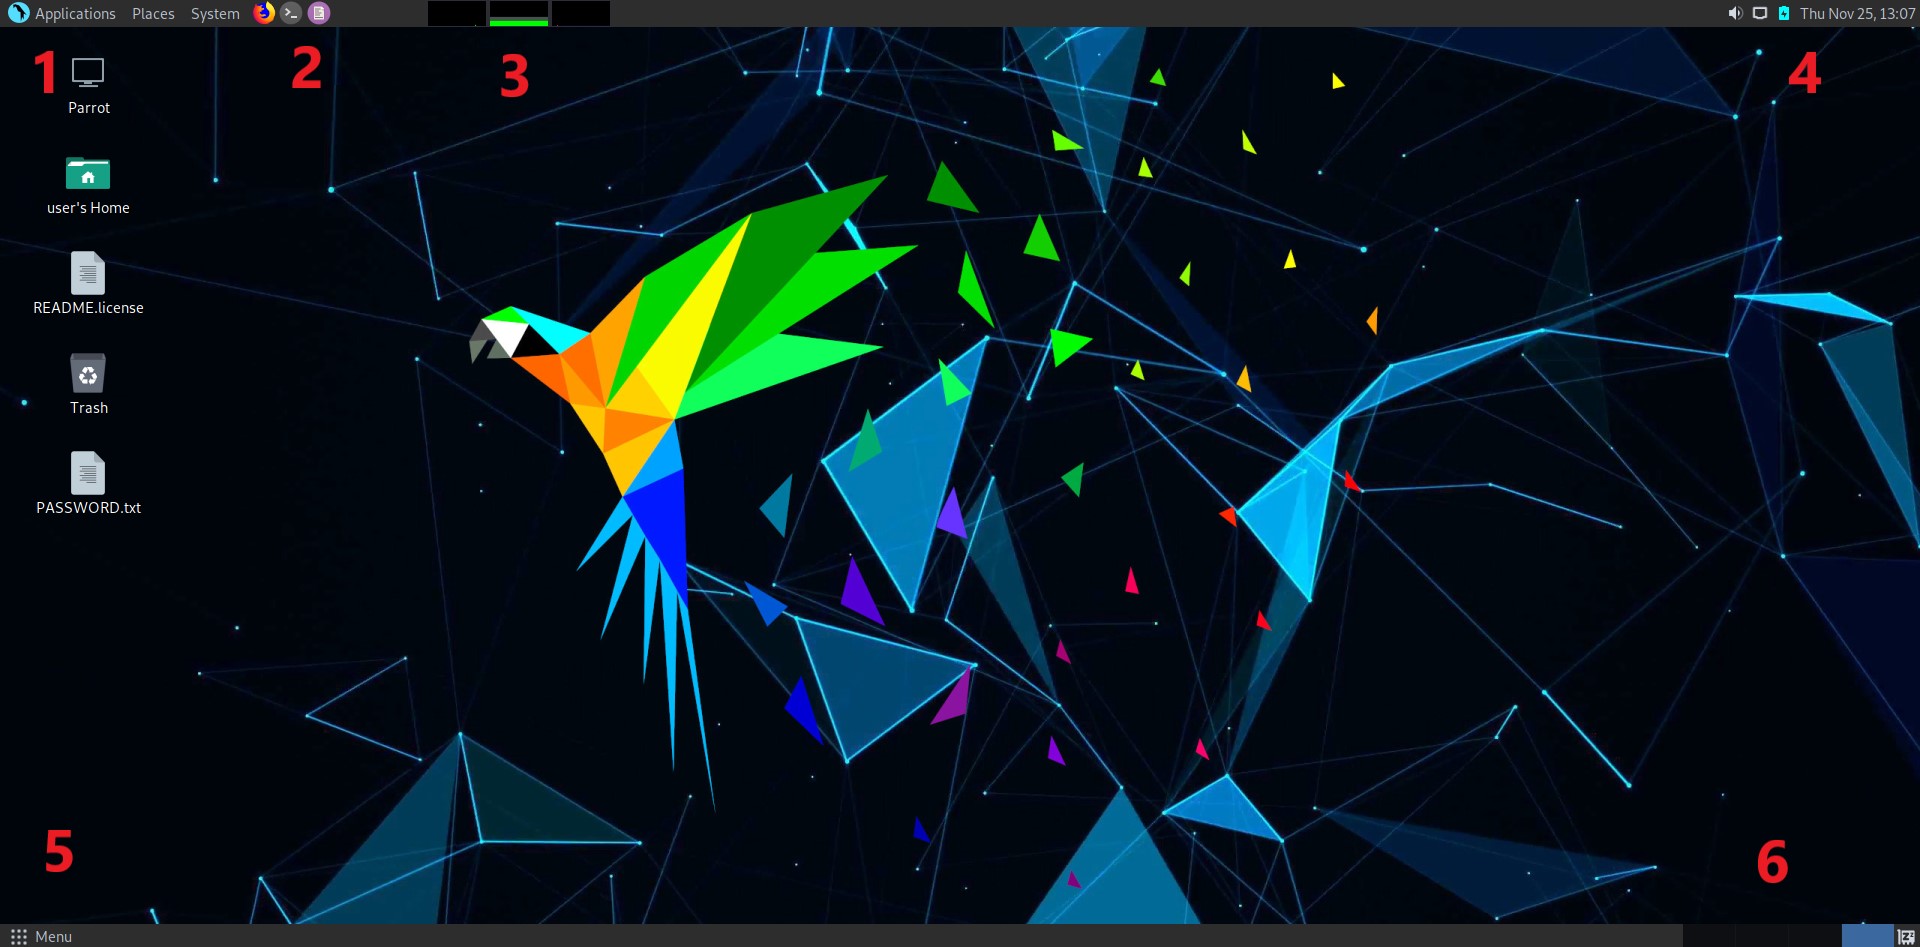
- [Applications]: The top left tab includes a pre-categorized collection of privacy, programming, system configuration, games, and libre office products.
- [Running apps]: Displays frequently used apps such as a terminal, Firefox browser, and Pluma text editor. You can also pin an application that you use frequently. for ease of access.
- [Memory usage]: Displays a graphical pane of the Network, Memory/RAM, and CPU usage.
- [Network Configuration]: Network management, battery management, Media settings, a clock, and a calendar are all available in the upper right corner.
- [Menu]: It's similar to the Application tab, however, it enables you to search for apps that aren't in the Applications category.
- [Work space]: Workspaces can help you keep track of your tasks while providing a clean layout. For example, you may have one workspace/zone with all of your communication windows, such as e-mail and chat software, and another workspace with your work. It's possible that your music manager is working from a third location.
Users Configuration
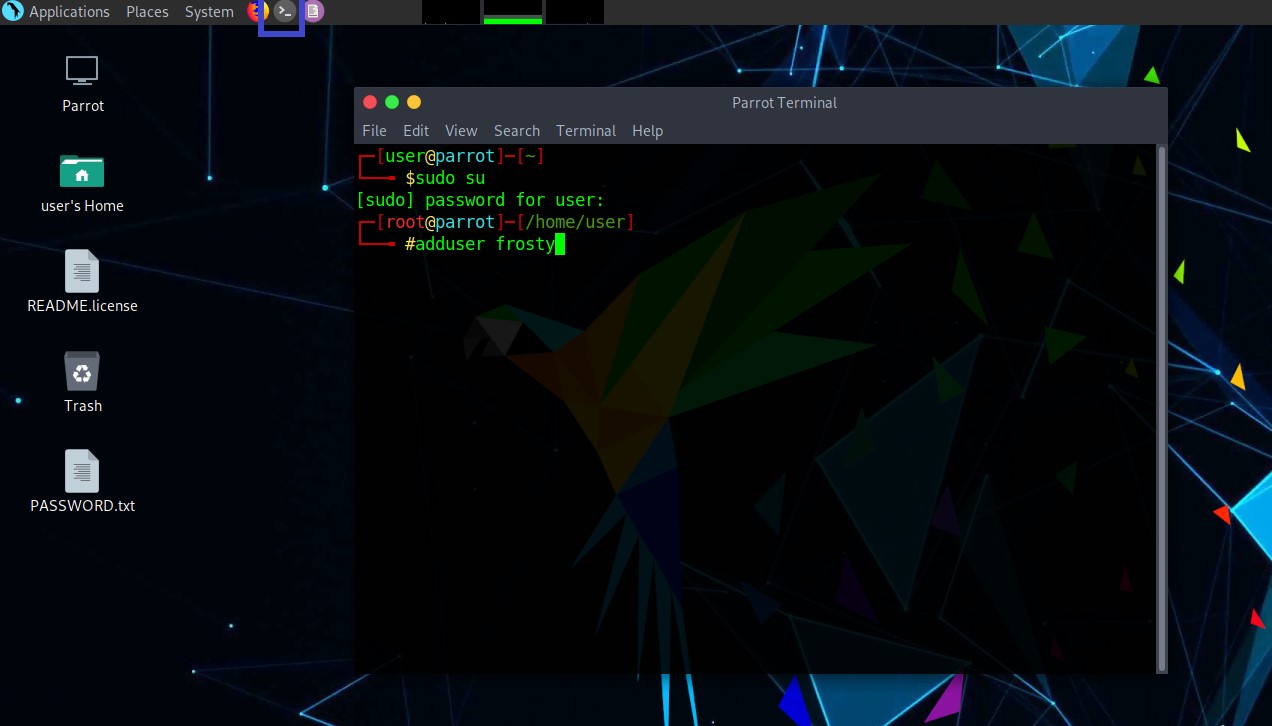
Step 1: Open the Terminal by clicking on the terminal icon at the top bar.
Step 1: Open the Terminal by clicking on the terminal icon at the top bar.
Step 2: For adding a new user you need to have root privileges. Type
sudo su
As in the above picture. It will prompt you for a password which is "toor" if you did everything correctly up to this point you will be logged in as root, now type
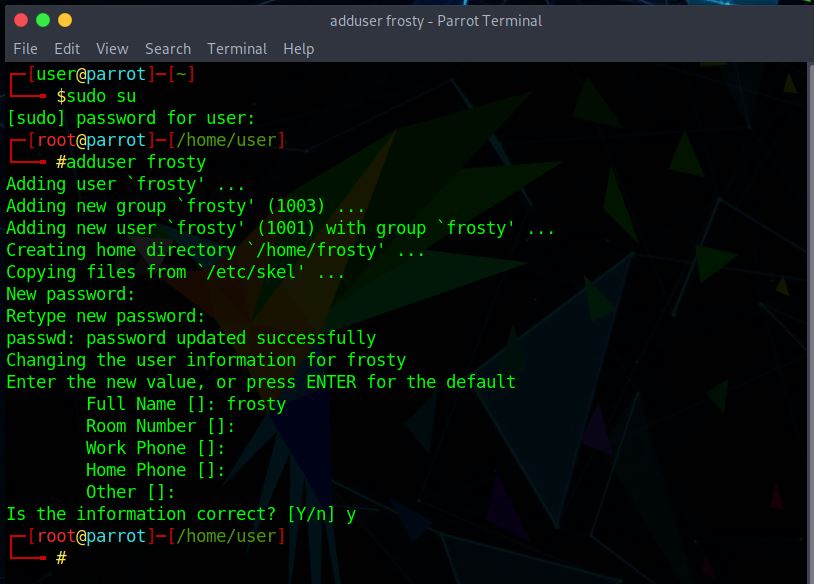
adduser <username>
(Replacing <username> with a choice of yours) and hit enter. It will prompt you for a password and retype the password, and a few details which can be skipped by hitting enter, continue by pressing "y" and hitting enter key on your keyboard.
Step 3: Now let's proceed to give the new user you created some privileges. Type the following one-liner command
echo "<username> ALL=(ALL:ALL) ALL" >> /etc/sudoers
Be sure to change the above <username> with the one you created in the previous step.


Comments